
As an ecommerce or retail brand, getting to page one of Google is the holy grail of traffic generation and marketing goals.
But how can you generate search traffic to your product pages and convert new customers with a positive ROI?
Google Ads and SEO are both effective channels for generating new customers. But for ecommerce and retail brands, there’s a third channel: Google Shopping.
75% of all ecommerce PPC clicks were made through Google Shopping in 2017, and the platform has only grown larger. Which means if you aren’t already using it, you’re leaving money on the table.
While you’ll still be paying for clicks, Google Shopping is proven to be cheaper than traditional PPC campaigns. Plus, you’ll be able to validate leads by displaying your products and prices before they even click through. The result? Qualified traffic that is more likely to convert.
Here are six simple steps to get your products showing on Google’s first page, and some tips on how to optimize your campaign.
What Makes Google Shopping Different?
Google Shopping is the closest thing to window shopping on the Internet.
Potential buyers can see the make, model and price of your product before they even click on your ad. If they don’t like it or think it’s too expensive, they move on to the next “shop window.”
This is what a user sees when searching for a specific product:
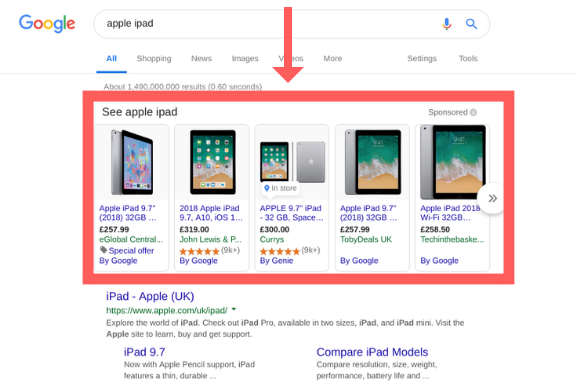
This prime real estate on the first page is reserved for Google Shopping. The reason some ecommerce stores neglect to use this effective platforms is because the interface is separate to a Google Ads account. Some think it’s too difficult, while some just don’t bother.
But once your Google Shopping campaign is built, you can easily link it into your Google Ads campaign (more on that a bit further down).
Before you set up a Google Merchant Center account, there are some guidelines your store must meet:
- You must have a secure checkout (https).
- People must be able to access your shopping cart from anywhere in the world. If you only sell your products in the US, you still need to enable anyone to get to your checkout with the product in their basket.
- Your website needs to be multilingual if you sell to different languages: Your site and your product need to match the official language of wherever the ad is showing.
- Your store must be transparent, including accurate contact information, billing, shopping and returns information needs to be available at all times.
If you don’t meet these rules, Google Shopping won’t allow you to advertise. Make yourself compliant before moving on to the rest of this guide.
Once you’ve ticked all the boxes, it’s time to stop leaving money on the table and get your campaign set up.
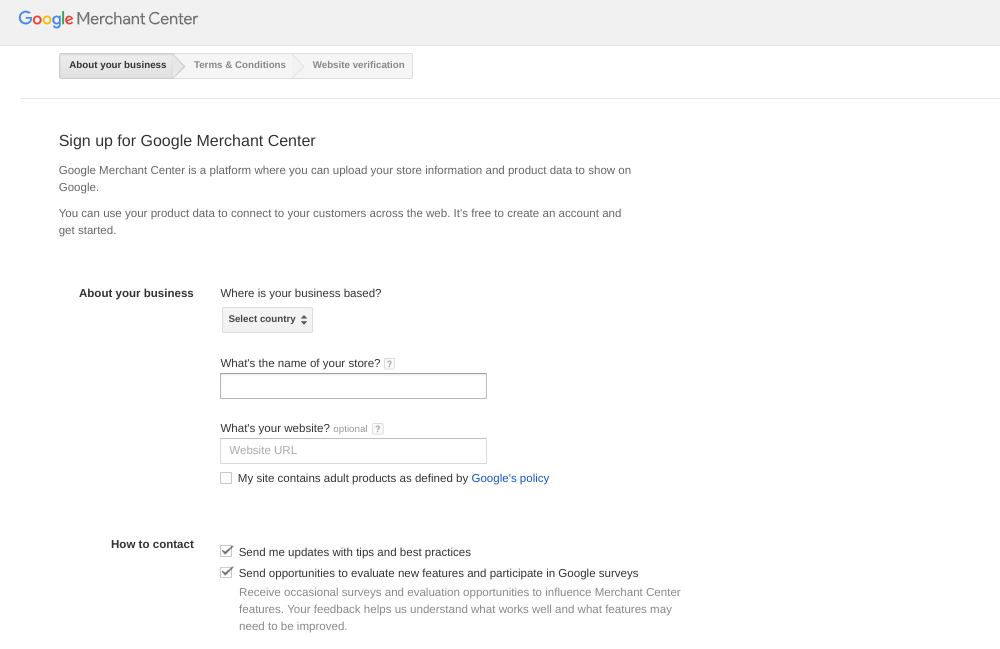
Step #1: Create A Google Merchant Center Account
To get your products to show as Google Shopping items, you must first create a Merchant Center account. This is a separate dashboard which holds and controls all of the data on your store’s products.
Click here to get started:
Firstly, you need to prove the ecommerce store is yours. You can find in-depth information about doing so here. To verify your site, you need to do one of the following:
- Verifying your Google Analytics Account
- Verifying your Google Tag Manager
- An HTML Tag
- An HTML File Upload
No matter which route you choose, you’ll need to add some code to your website so Google can verify your store.
Verifying through Google Tag Manager (GTM) requires the least amount of coding. Head to your GTM account, go to the Admin Tab, and select ‘Install Google Tag Manager’. You’ll be given the following code:
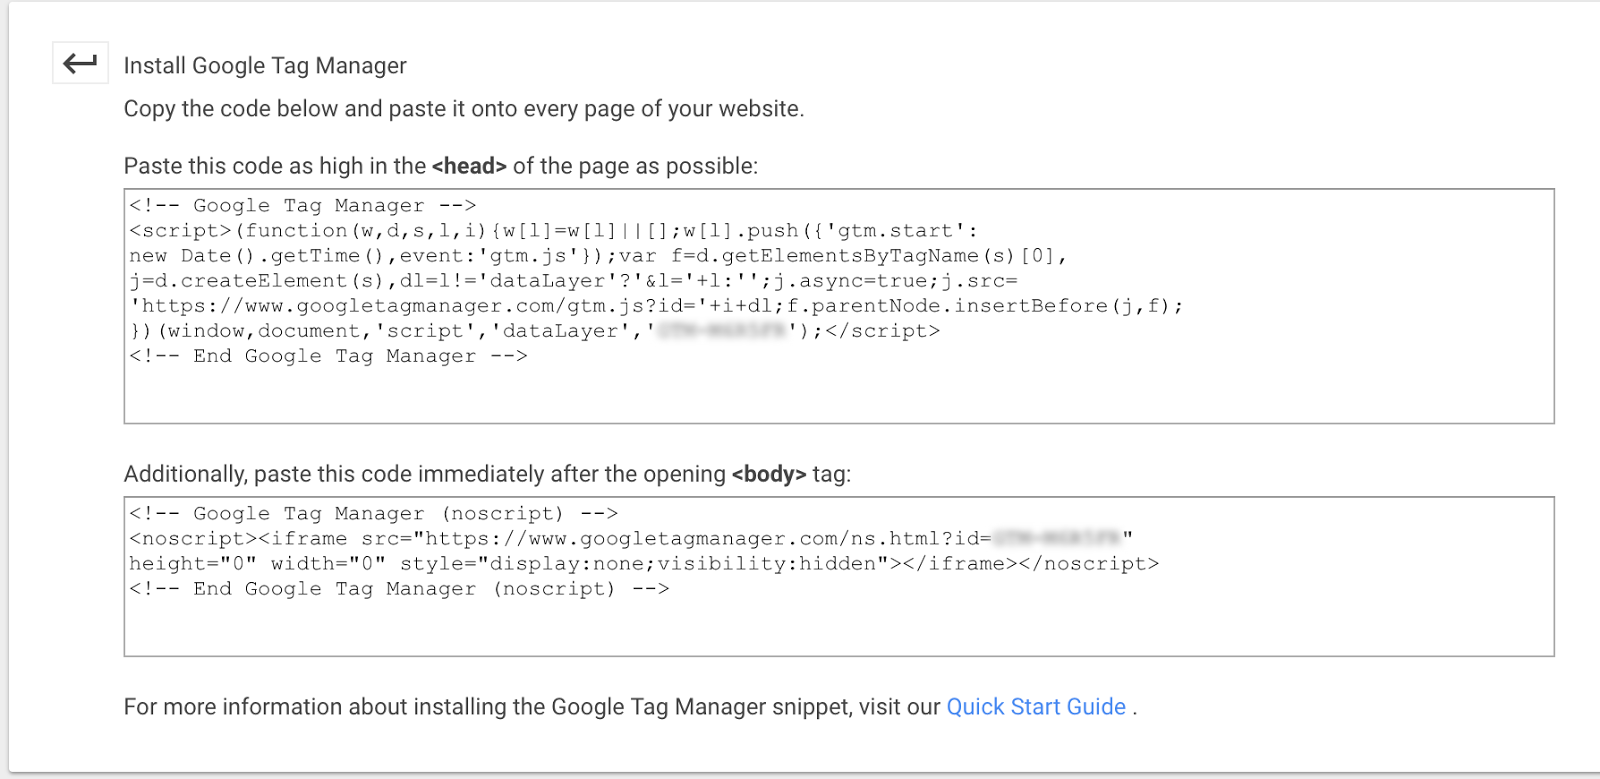
Once you place these two pieces of code on your website, you’ll be set. If you don’t have a Google Tag Manager account, or would like to use a different option, check out Google’s guide on how to do so.
Step #2: Set Your Tax And Shipping Rules
It’s important to set up your tax and shipping information correctly before you go live with your Google Shopping listing.
While the tax rules will depend on your location (find the specific rules for your location here), everyone’s Google Merchant Center dashboard looks like this:
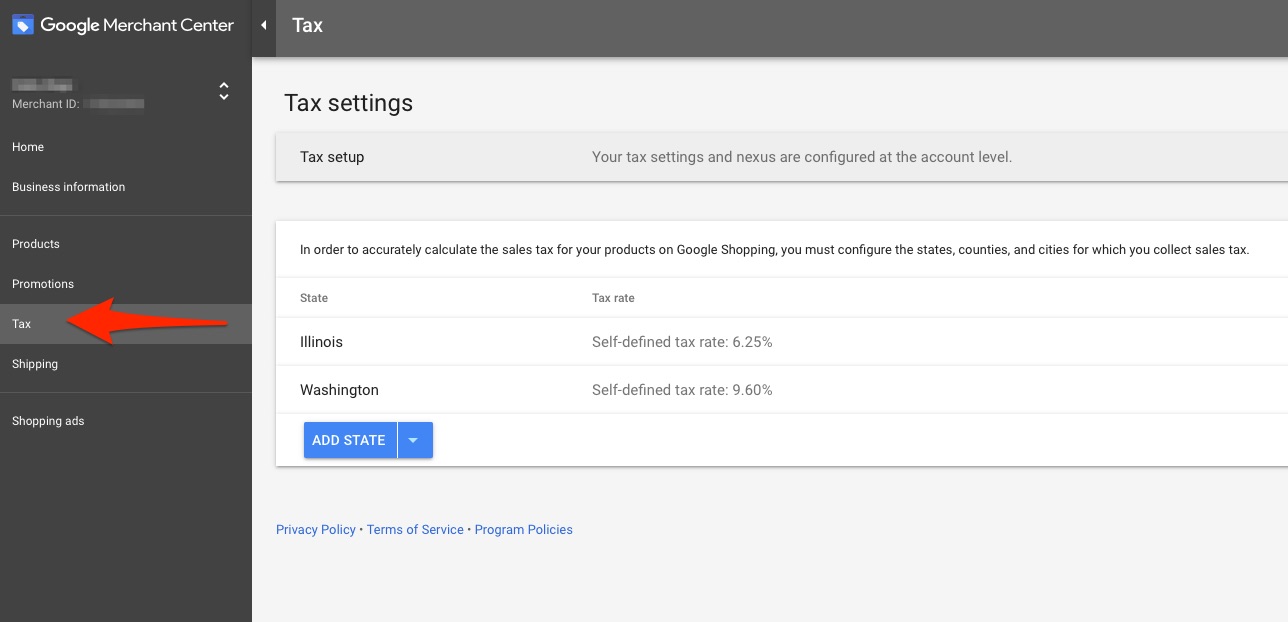
Select “Tax” and enter as much information on each state or country as needed. You must make sure you enter your tax information accurately. Google has been known to disable or ban accounts that fail to include the correct information in the past.
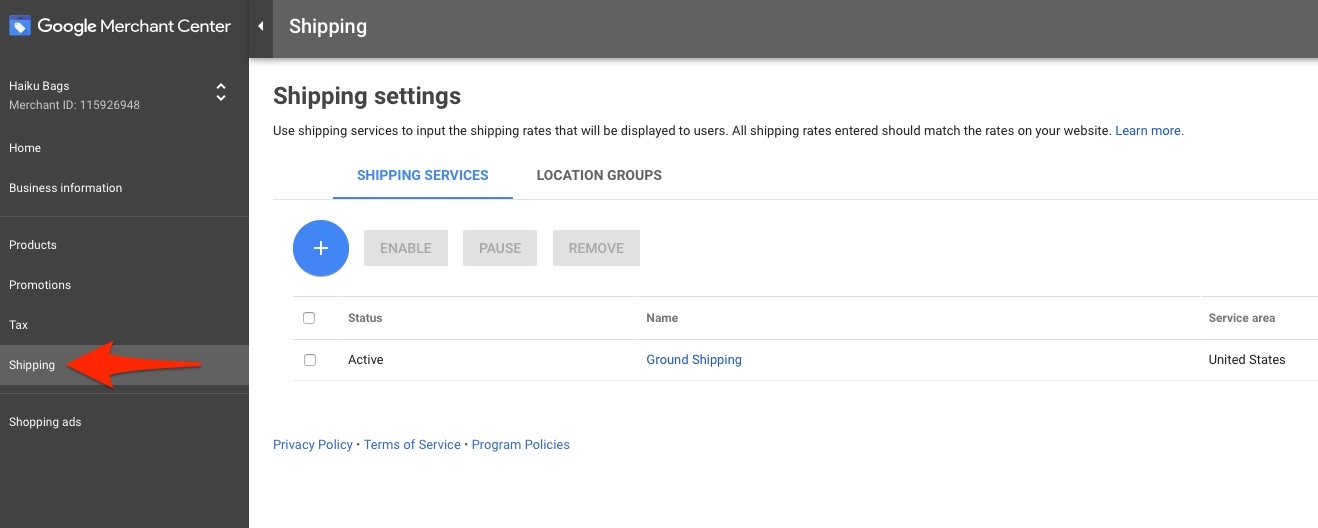
Setting up your shipping will be a lot easier. It’s simply a matter of entering the pricing parameters you already use for your ecommerce store.
To do this, click on the ‘Shipping’ tab (located directly underneath the ‘Tax’ tab) and enter the relevant information there:
Step #3: Gather All Your Product Information
To advertise your products on Google Shopping, there are certain elements you must include for each product. These include the following:
- Heading
- Image
- Description
- Price (including currency)
- Product Availability
- A Purchase Button
If your page is missing any of these elements, there’s a chance Google will disapprove your campaign. Next, every product you are selling must include:
- A product ID
- Condition (new, used etc)
- Price (Including currency)
- Shipping Options
- Availability
- MPN (Manufacturer Part Number)
- Brand
This information is required before you can launch a Google Shopping campaign. Once you have this organized, you are ready to move to step #4. We recommend you spend some time sorting through your data, as it will make setting up your Google Shopping campaign faster and easier.
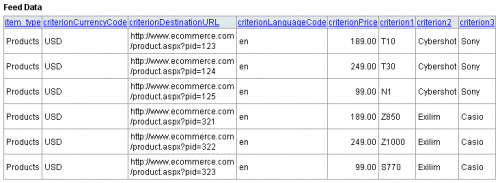
Step #4: Create Your Product List and Feed It To Google
To start selling your products, you need to upload your products by creating a data feed.
Don’t be fooled by the name. A data feed for your Google Shopping campaign is simply another way of saying “product spreadsheet,” which you prepared in the previous step.
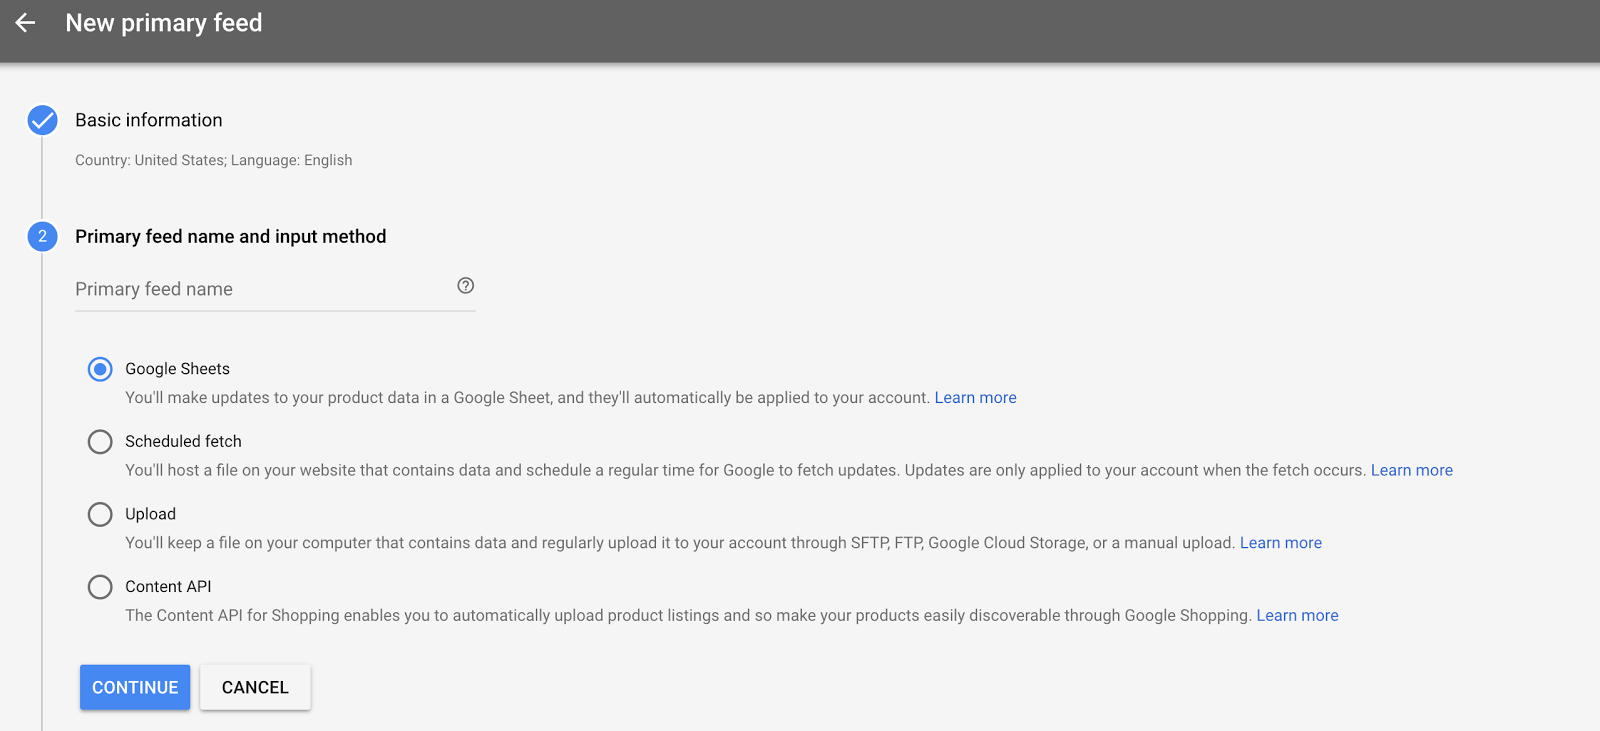
To add a product feed, go to your Merchant Center dashboard, and press “+” under “Feeds:”

From here, Google gives you several options to feed in your product data:
The easiest method is to directly upload a Google sheet. This is the recommended option on the interface, and it reduces the chances of errors when uploading your product data. From here, it’s just a matter of filling in the sheet with all of your product information:
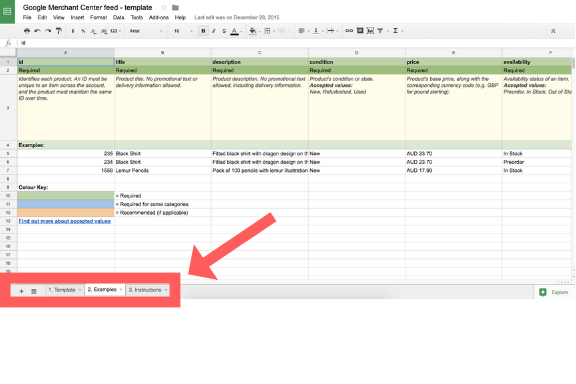
If you aren’t sure where your data should appear, you can navigate between the tabs at the bottom of the spreadsheet to see Google’s examples (as well as some more information).
Pro Tip: If you sell a large number of products and want to keep your store as up-to-date as possible, on the last step of your setup, click ‘Create an upload schedule:’
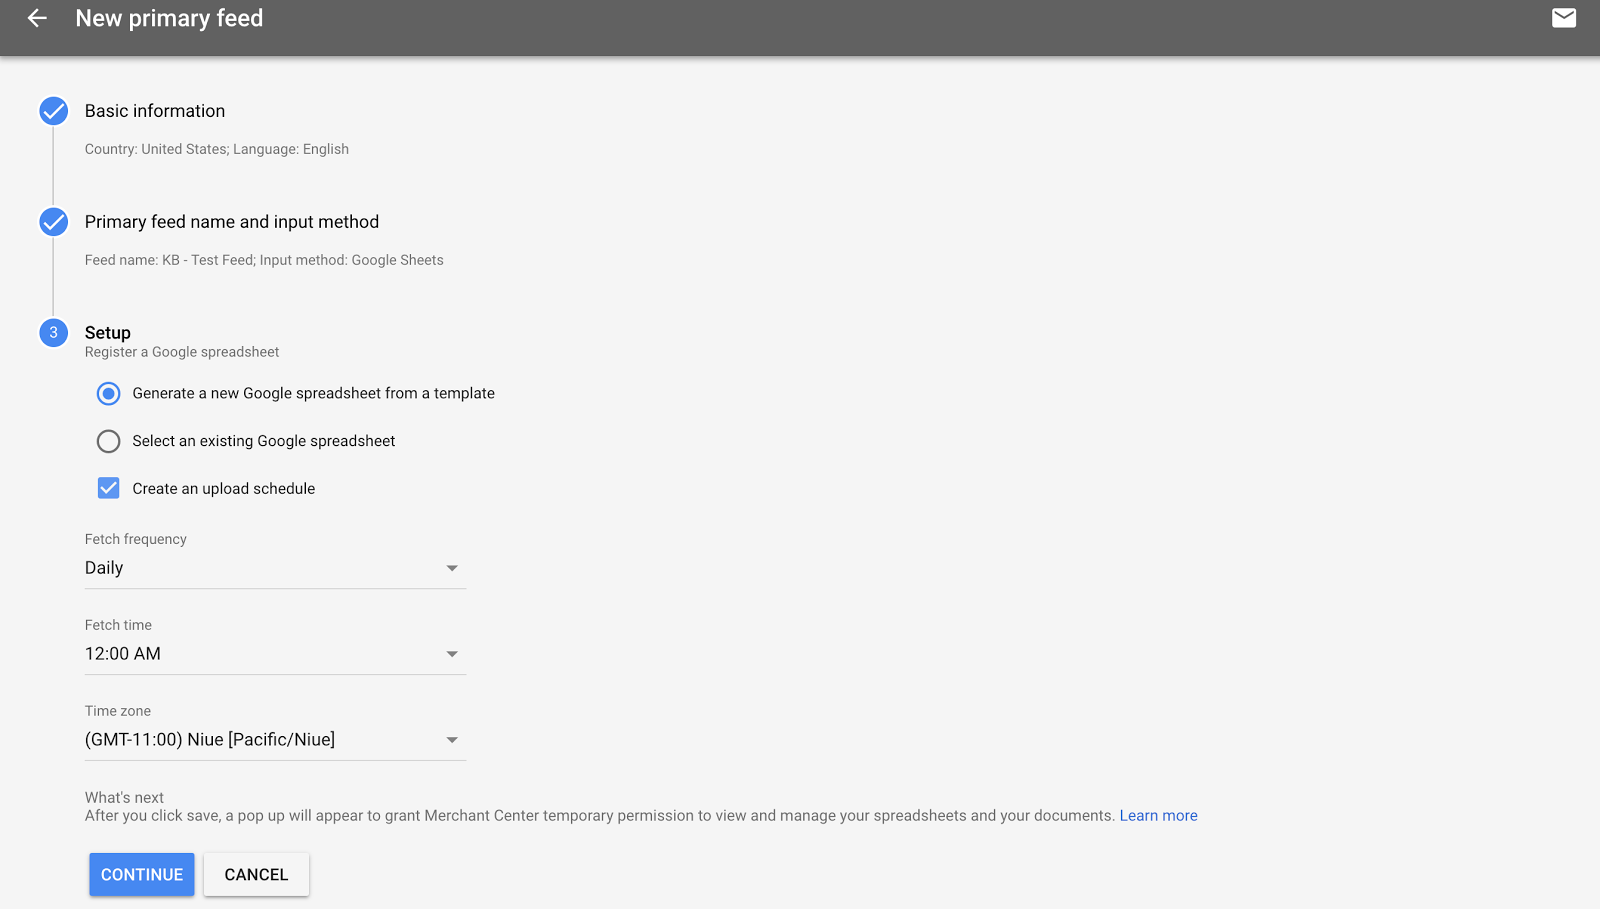
By doing this, Google will automatically refresh your data into the system from your chosen upload preferences. Google will also need updated product data once a month. This level of automation makes the process much easier for you.
Once finished, this is what your data feed will look like on your Merchant Center dashboard:
Step #5: Connect Your Google Ads Account
The next step is to connect your Google Ads accounts so they both work together.
Open up your Google Ads account and have your 10-digit ID ready to make the linking process quick. In your Merchant Center account, click “Settings” then “Account Linking”:
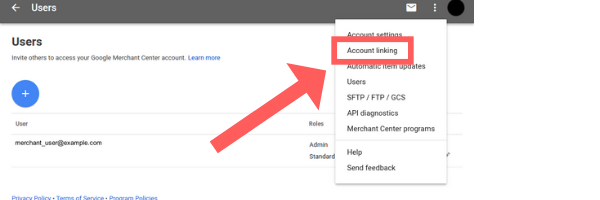
From here, just link your Google Ads directly using your 10-digit ID.
It’s important that the email address associated with your Google Ads campaign is the same address you used to open up your Merchant Center account, or it at least has admin access to both accounts.
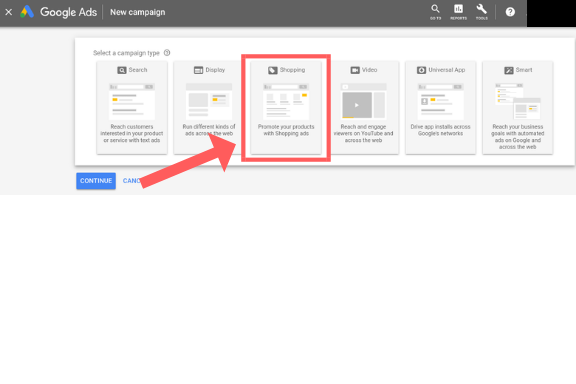
Once the accounts are linked, create a simple campaign in your Google Ads account so the ads will begin running. Once done, the information will be shared between the two accounts, and you can gauge performance for each product and optimize accordingly.
A campaign with a single product group and bid structure will do here. First, create a new campaign and select “Shopping” as the campaign type:
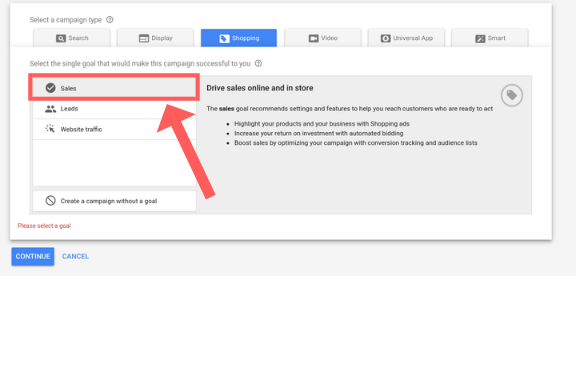
Next, make your campaign goal “Sales”. This campaign type was built specifically for ecommerce stores and will appear for searchers who are actively looking to purchase:
Once you’ve done this, go ahead build your campaign in Google Ads as you normally would. Choose your targeting settings (including Geo-Targeting), bidding strategy and devices.
Ready to optimize your PPC campaigns for even greater results? Check out our in-depth guide on PPC Keyword Research here.
Step #6: Set Up Conversions To Track Sales
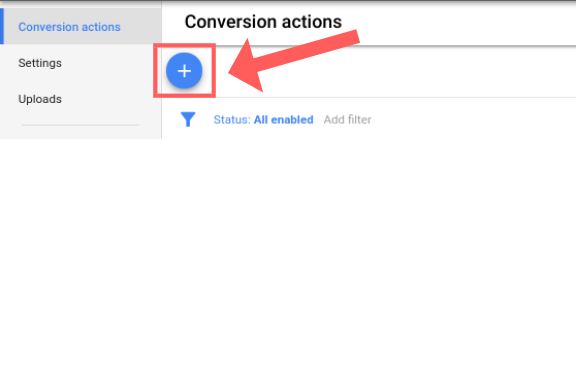
The final step to setting up your Google Shopping account is to enable conversion tracking.
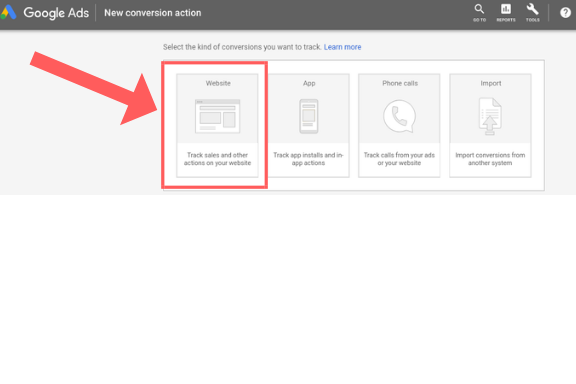
To keep the information accurate, we recommend doing this while your campaign is still inactive. Just add a new conversion action like so:
And connect it your ecommerce website:
Enabling conversion tracking will make it far easier to optimize, segment and adjust your campaign. In other words, you’ll track every touch-point — from ad clicks to product sales.
How To Optimize Your Campaign and Boost Product Sales
Generating fresh traffic and customers is the main goal for your Google Shopping campaign. Which is why it’s important to optimize your campaigns as much as possible. Here are some methods to generate more clicks with a healthy CPC (and ROI):
Optimization Technique #1: Maximise Sales With Better Product Titles
The fastest way to get your ad seen as many times as possible is to optimize your product titles. To do this, put yourself in your customer’s shoes. Find out how people are finding your products in the first place.
Uncover the most common search queries leading to a particular product by clicking on Dimensions > Search Terms, and add the winner to the front of your listing description.
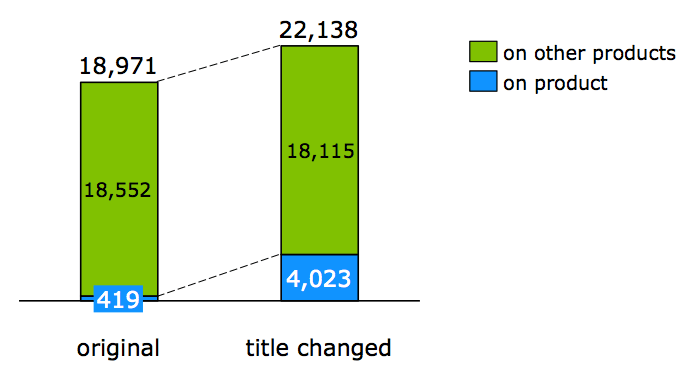
For example, this clothing brand dramatically increased their results by a simple change to their product descriptions:

By digging in their search results, the company found that customers were finding the Lipsy Lace dress by searching for “Party Dresses”. This addition to the ad title boosted their click-through-rate by over 3600 clicks:
This is a simple optimization hack that takes under a minute to implement. And the results could mean thousands of extra sales for your ecommerce store.
How To Do It: The Secret Sauce to a Great Product Title
As learned in the previous example, it should be no surprise that your product title is one of the most important parts of your ad.
When writing your product titles, there are a few things to consider. Firstly, is your brand well known in the product space? If not, don’t place your company name first. Google reads product descriptions from left to right, so if your product isn’t immediately relevant, it’s more likely to get ignored.
Secondly, think about your target market. Are you targeting people who are window shopping, or buyers who are hunting for a specific product or model?
“Window shopping” product titles are less specific, so a simple rule of thumb is to write them like this:
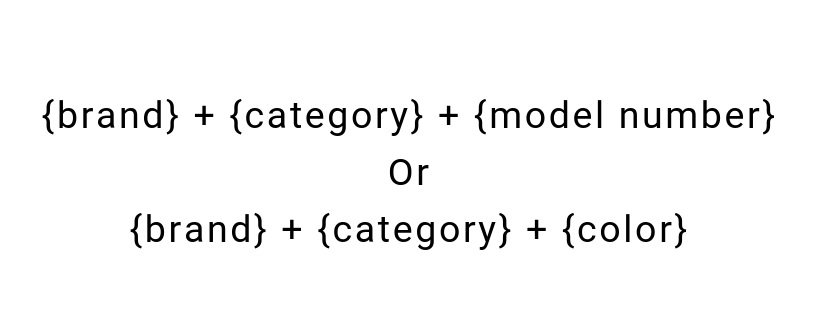
Let’s say you run an ecommerce store that sells refrigerators. A typical household owner will be searching for items like “stainless steel refrigerator”. But a professional buyer hunting for a specific model is more likely to search for something like “Kenwood KNF60X18 60/40 Fridge Freezer – Inox”.
If you want to target these buyers, use a product title like this:
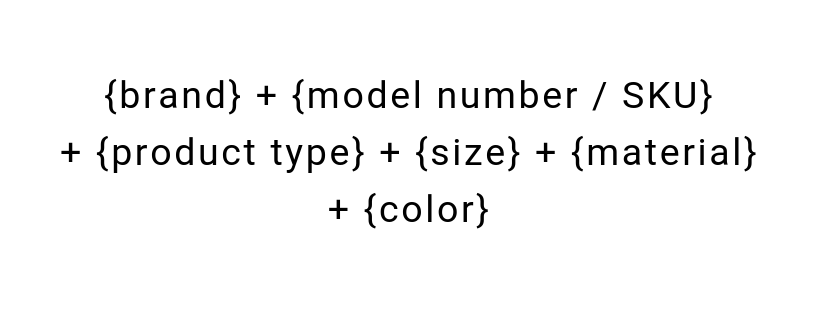
Of course, a model number doesn’t apply to something like a clothing ecommerce store. To make it more relevant to what you offer, just replace any category that doesn’t apply for something more appropriate, such as {material} or {gender}.
Hack #2: Find Your Best Sellers and Segment Them
Are some of your products selling better than others? Quickly uncover this data by clicking the “Dimensions” tab in your campaign and then selecting “Item ID:”

Here is where all of that tedious work from setting up your campaign pays off. The Item ID you assigned each individual product will now have a record of how many times it’s been purchased.
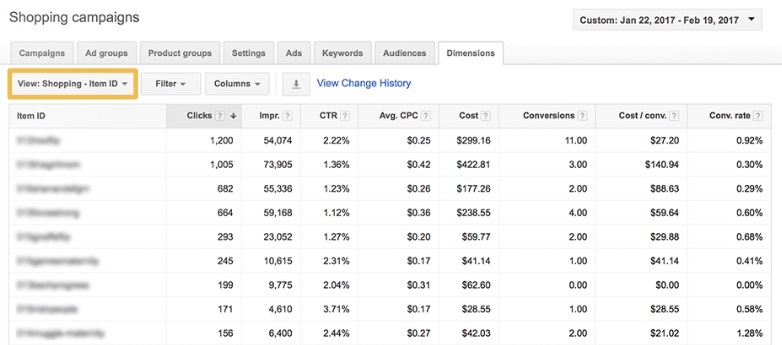
You can now see how many times each item has been clicked, as well as how many times it’s been purchased.
Here, you’ll uncover stand-out products that are performing better than others. From here, you have the option to pull them out and segment them into their own campaigns.
This allows you to increase their individual ad bids and optimize them for a specific audience, generating more revenue into your store as a result.
Hack #3: Make Sure You Are Using High-Quality Product Images
“Real world” window shopping rules apply to Google Shopping. If something seems to be of poor quality, people won’t buy it. On Google, this starts with the quality of your product images.
If you’re using stock imagery, it’s likely the same image is being used by a dozen other stores on Google. And if your product is even a single cent higher in price, it can dramatically affect your click-through rate.
Take this example. Nearly all of the images for the product are identical, apart from one:
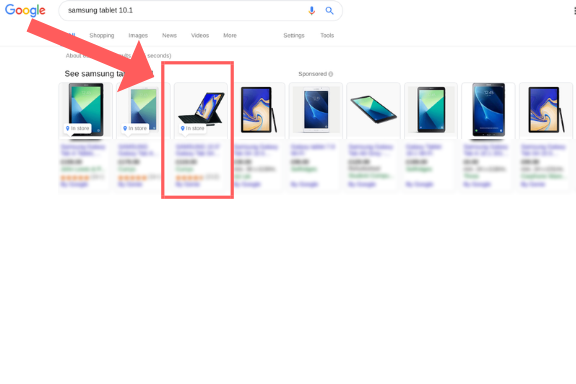
Something as simple as unique product photos can make a huge impression on shoppers. It shows you’ve made an effort, and can help you stand out from other results on the SERPs.
Investing in high-quality product photography helps to connect with your customers on a personal level. This builds your credibility and greater trust with your customers.
Google Shopping Is Constantly Changing — Make Sure Your Campaign Keeps Up
The game on Google Shopping can change every day. Even every hour, depending on your competitors, pricing and Google updates.
Google is constantly updating and optimizing all of their products, which includes Google Shopping. That’s why it’s important to keep on top of your campaign and soak up any updates Google rolls out to make the most of your ad spend.
Because you’ve set your campaign up properly from the start, it’ll be easier for you to segment and optimize to get the best ROI possible.
Images:
Featured image: via Unsplash / Heidi Sandstrom
Images 1, 2, 8, 10, 11, 12, 13, 14, 15, 19, 20, 21, 23 : Screenshots taken by the author, April 2019
Images 3, 6, 7, 9: KlientBoost
Images 4, 5: Shopify
Images 16, 17: Search Engine Land
Image 18: Visture
Image 22: Neil Patel